How to Animate the Workout Countdown Timer
Different ways of animating an animatable property
by
 Lou Franco
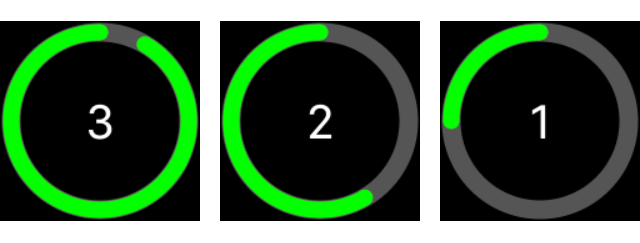
In the last article, we made a countdown view with an animatable countdown property that controlled the arc of ring. It looked like this:
And here was the final code:
struct CountdownView: View {
  @Binding var countdown: CGFloat

  var body: some View {
    ZStack {
      Text("\(String(format: "%.0f", min(3, ceil(countdown + 0.01))))")
        .font(Font.system(.largeTitle).monospacedDigit())
        .foregroundColor(Color(.white))
      Circle()
        .stroke(lineWidth: 15)
        .foregroundColor(Color(.darkGray))
        .padding(10)
      Circle()
        .trim(from: 0, to: countdown / 3.0)
        .stroke(style: StrokeStyle(lineWidth: 13, lineCap: .round, lineJoin: .round))
        .rotation(Angle(degrees: 90))
        .rotation3DEffect(Angle(degrees: 180), axis: (x: 1, y: 0, z: 0))
        .foregroundColor(Color(.green))
        .padding(10)
    }
    .frame(maxWidth: .infinity, maxHeight: .infinity)
    .background(Color(.black))
  }
}
Look at the previous article if you want to know how this works.
In this article we'll learn how to animate this view by manipulating how we set countdown.
Try out automatic animation
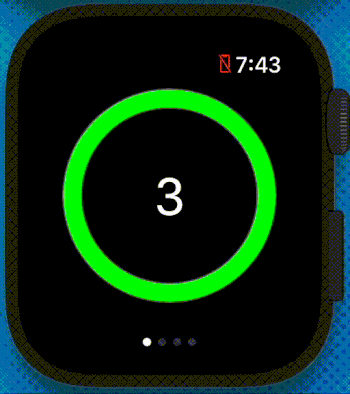
Before I code up something complex, I like to see what happens with a simple implementation. So, here is code that sets countdown to 3 when the view initializes and then animates changing it to 0 once it appears.
struct AnimatedCountdownView: View {
  @State var countdown: CGFloat = 3

  var body: some View {
    CountdownView(countdown: $countdown)
      .onAppear() {
        withAnimation(.linear(duration: 3)) {
          countdown = 0
        }
      }
  }
}
If you do this, you'll get this animation:
You see that the ring animates, but the text does not. This is because SwiftUI will see that the trim that is controlling the ring's arc is changing, and it knows how to interpolate between the different values of trim.
But, It doesn't know how to interpolate the different Text strings, so it just uses the "1" that it is set to at the end.
So, if we need to have more control over what happens, we need a more complex animation.
Trying to fake chained animations
If you know UIKit, you could imagine chaining 3 animations, each handling a third of the ring animation and changing the number. But unfortunately, SwiftUI doesn't offer any way of chaining animations or running things on animation completion.
If we try to use asyncAfter(deadline:) to fake the chaining, we'll see a jerky animation as it's impossible to get the timing of this scheduler to exactly match the one in the animation scheduler.
I've tried a bunch of ways to do this, and what I've found to work the best is to use my own timer to coordinate the animations.
To do that, add this code to AnimatedCountdownView
let timer = Timer.TimerPublisher(interval: 1.0, runLoop: .main, mode: .common)
  .autoconnect()
  .prefix(3)
This creates a timer that will emit 3 ticks, each a second apart, once it is connected to. We use prefix(3) to complete the timer so that it will stop automatically after 3 seconds. Also, we won't need to unsubscribe from it, since this happens automatically after it completes.
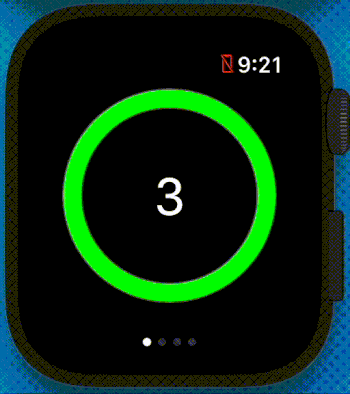
Here's how we use it in the view':
struct AnimatedCountdownView: View {
  @State var countdown: CGFloat = 3

  let timer = Timer.TimerPublisher(interval: 1.0, runLoop: .main, mode: .common)
    .autoconnect()
    .prefix(3)

  var body: some View {
    CountdownView(countdown: $countdown)
      .onReceive(timer) { _ in
        withAnimation(.linear(duration: 1.0)) {
          countdown -= 1.0
        }
      }
  }
}
And it looks like this:
Using a custom timing curve
But, breaking up the animation also gives us the opportunity to try different animation curves (besides linear). If you look at the Apple Workouts app, you'll see that it seems to stop momentarily each second. We can get that effect with easeOut by replacing the withAnimation line with:
withAnimation(.easeOut(duration: 1.0)) {
Try it to see how it looks.
It's ok, but the effect is way more muted than the real Workouts app.
In addition to built-in timing curves like linear and easeOut, Apple provides an undocumented way to build custom curves called timingCurve.
This function takes 4 magic parameters, and there's nothing in documentation to explain how to use them.
Luckily, a StackOverflow hero named Fogmeister figured it out and points to this site to build custom curves. You can play around with the two control points, and then use their coordinates as the parameters.
I liked how it looks with this curve:
withAnimation(.timingCurve(0.23, 0.97, 0.08, 0.97, duration: 1.0)) {
And here's how the animation looks:
Try this out with your own curve parameters.
In a real app, we'd want to start a workout when the countdown completes, but before we can do that we have to get permission from the user to get the user's heartrate and workout performance.
In the next article we'll look at getting HealthKit permissions for gathering data during workouts.
Subscribe to be notified of the next WatchKit article
This article is part of a series covering Workout apps. If you want to see articles about WatchKit in general, see How to Develop Apple Watch Apps with WatchKit.
Make sure to sign up to my newsletter to get notified when a new article is published.
Contact me if you are working on a Watch app and need help.
Next Article: How to Get HealthKit Permissions in WatchKit