How to Develop a Workout Countdown in Watchkit
Create a View that can render any single frame of an animation
by
 Lou Franco
Making a countdown animation for your workout app is really not that different than any other SwiftUI based animation you might do.
But, we have to start somewhere, and there is one surprising thing I learned while doing it. I don't want to bury it at the end of the article, because it's the most important thing you need to know.
Apps on the watch do not keep running when the watch goes idle (for example, when you lower your wrist). Workout apps only keep running if they are in an active workout.
Therefore, you must start the workout before you start the animation, and then immediately pause the workout until the animation is done.
If you do not do this, the user may start the workout and then lower their wrist. The app will go to sleep, and when they look at the app to see how it's going, it will complete the animation and then start the workout.
We'll get into workouts and how to start and pause them in a future article. And then, I'll be sure to show you how to do this correctly, but it's an important point I wanted to make now.
Creating the Animation
Here's what we'll try to do:
Here is my suggestion for how to do these kinds of things generally in SwiftUI.
- Create a new View that represents one frame of the animation.
- Use
@Bindingvariable that maps some input to the frame. - Make sure that the variable can be animated to the in-between frames by making it a
CGFloator some floating-point type. - Write
bodyso that it returns a View based on this variable. - In your previews, make several
@Statevariables to represent the key frames and make a preview for each one.
Note that we are not using any animation here at all, we're just exposing a binding variable that can be animated. We'll let the caller decide how to set this binding.
Create the View
Here's some code to start from. It puts the countdown number in the center of a green circle (that has a gray circle under it)
struct CountdownView: View {
  var body: some View {
    ZStack {
      Text("3")
        .font(Font.system(.largeTitle).monospacedDigit())
        .foregroundColor(Color(.white))
      Circle()
        .stroke(lineWidth: 15)
        .foregroundColor(Color(.darkGray))
        .padding(10)
      Circle()
        .stroke(style: StrokeStyle(lineWidth: 13, lineCap: .round, lineJoin: .round))
(x: 1, y: 0, z: 0))
        .foregroundColor(Color(.green))
        .padding(10)
    }
    .frame(maxWidth: .infinity, maxHeight: .infinity)
    .background(Color(.black))
  }
}
This draws what we want it to look like at the beginning of the animation.
Now, to start making it useful, we need to first add a binding variable. Add this code to the CountdownView
// Set countdown to a number from 3 to 0. It's animatable.
@Binding var countdown: CGFloat
We are going to use countdown to render the view.
Basing the render on the binding
Now that we have added a way to control the rendering, we have to start using it.
The simplest thing to do is to use the countdown in the center of the view. You might be tempted to do:
Text("\(countdown)")
But, remember that countdown is a floating-point number that will be set to values between 3.0 and 0.0, but since we want to animate it, it will take on many non-Integer values.
We want the view to show the integers between 3 and 0, and we want it to show 1 at the end when the countdown is 0, so we'll add 0.01 to it and use ceil so that we get the effect we want. We also need to make sure it maxes out at 3.
So, replace Text("3") with:
Text("\(String(format: "%.0f", min(3, ceil(countdown + 0.01))))")
This will make the countdown show 3, then 2, then 1 even as countdown will go from 3.0, 2.88, 2.67, down to 0.2, 0.1, 0.
Fix the Previews
Our previews won't build until we fix the calls to our view, so at the top of the preview struct, add:
@State static var countdown1: CGFloat = 2.66
@State static var countdown2: CGFloat = 2.25
@State static var countdown3: CGFloat = 1.25
@State static var countdown4: CGFloat = 0.25
and use them in several CountdownView calls
static var previews: some View {
  CountdownView(countdown: $countdown1)
  CountdownView(countdown: $countdown2)
  CountdownView(countdown: $countdown3)
  CountdownView(countdown: $countdown4)
}
We should see the numbers from 3 to 1, but we still have a full circle.
The next step is to only show a part of the green circle.
Using countdown to draw part of a shape
In SwiftUI, shapes with a path (like Circles) can be set to be trimmed, meaning that you can set a start-percent and end-percent, and the shape will only be drawn between those points.
For us, we want the circle to be drawn from 0% to an end based on countdown. It's 100% (or 1.0) when countdown is 3 and 0% when countdown is 0. We get that with countdown / 3.0
So, we can go to the green circle and add the trim as the first modifier.
.trim(from: 0, to: countdown / 3.0)
The problem with this is that we now see that Circles are drawn from their right-most point and clockwise. We want it to be drawn from the top and counter-clockwise.
We can fix that with rotation effects.
Using Rotation Effects
When we set the countdown to 2.75, 1.75, and 0.75, it looks like this:
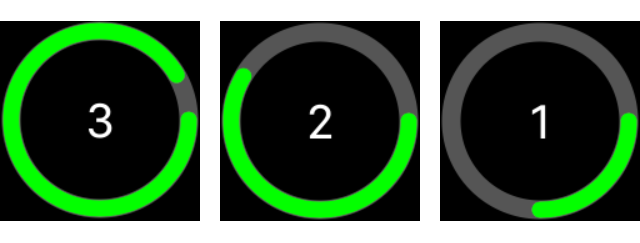
There are two rotations we need to get the circle to be drawn the way we want.
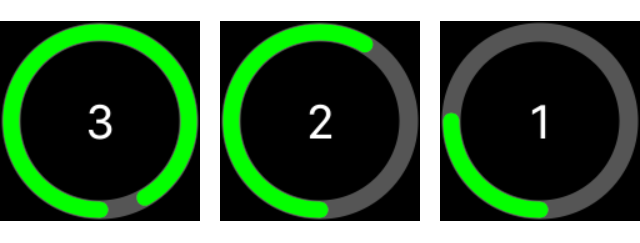
The first one is in the 2D plane of the watch screen, to get the start point to the bottom of the render, or a 90 degree rotation. It would then look like this:
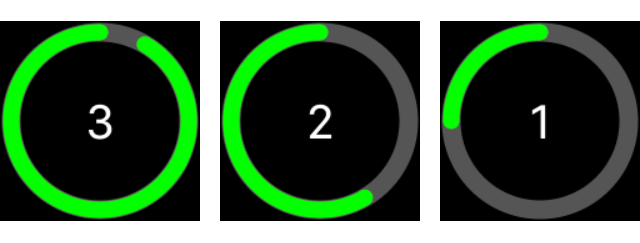
Then, we want to flip the whole thing in 3D around the X-axis 180 degrees. That would move the start point to the top and also make the drawing go counter-clockwise. It now looks how we wanted it to:
You can add these effects by adding the following two modifiers to the green circle directly below the stroke modifier.
.rotation(Angle(degrees: 90))
.rotation3DEffect(Angle(degrees: 180), axis: (x: 1, y: 0, z: 0))
If you have trouble seeing why these work, comment out each line or change the angles to see how it affects the final render.
Here's the final code:
struct CountdownView: View {
  @Binding var countdown: CGFloat

  var body: some View {
    ZStack {
      Text("\(String(format: "%.0f", min(3, ceil(countdown + 0.01))))")
        .font(Font.system(.largeTitle).monospacedDigit())
        .foregroundColor(Color(.white))
      Circle()
        .stroke(lineWidth: 15)
        .foregroundColor(Color(.darkGray))
        .padding(10)
      Circle()
        .trim(from: 0, to: countdown / 3.0)
        .stroke(style: StrokeStyle(lineWidth: 13, lineCap: .round, lineJoin: .round))
        .rotation(Angle(degrees: 90))
        .rotation3DEffect(Angle(degrees: 180), axis: (x: 1, y: 0, z: 0))
        .foregroundColor(Color(.green))
        .padding(10)
    }
    .frame(maxWidth: .infinity, maxHeight: .infinity)
    .background(Color(.black))
  }
}
We'll connect this up to a timer in the next article
Subscribe to be notified of the next WatchKit article
This article is part of a series covering Workout apps. If you want to see articles about WatchKit in general, see How to Develop Apple Watch Apps with WatchKit.
Make sure to sign up to my newsletter to get notified when a new article is published.
Contact me if you are working on a Watch app and need help.
Next Article: How to Animate the Workout Countdown Timer