How to develop page based navigation UI on Apple Watch
For watchOS 7 and watchOS 6
by
 Lou Franco
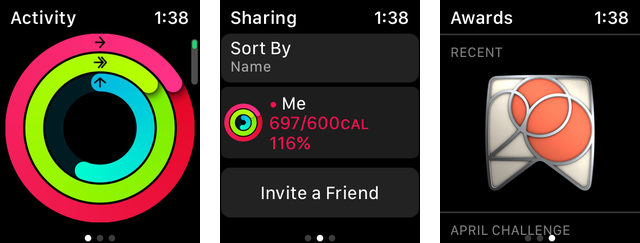
On the Apple Watch, it's possible to have a set of screens that are peers to each other. You get to each page with left and right swipes. The bottom of the screen has a dot for each page in the set, with the current one lit up. Here it is in the Activity app:
Page interfaces are also in iOS. The home screen is built with it. In UIKit, you'd use UIPageViewController and related classes to build it.
There was no equivalent built-in way to do this when SwiftUI first came out in 2019. Developers that needed pages used a hybrid approach.
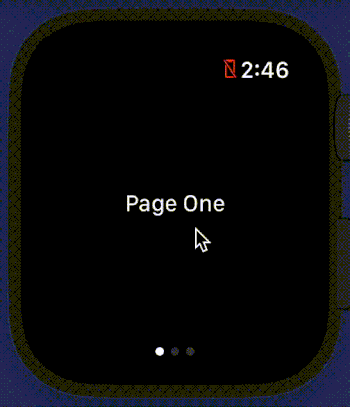
But in watchOS 7 and iOS 14, Apple introduced PageTabViewStyle that you can use along with TabView to put views into pages. Set it up in the WindowGroup in your watch app's entry-point:
struct AppOMatWatchWorkoutSampleApp: App {
  var body: some Scene {
    WindowGroup {
      // These Views will end up in pages.
      TabView {
        Text("Page One")
        Text("Page Two")
        Text("Page Three")
      }
      .tabViewStyle(PageTabViewStyle())
    }
  }
}
It looks like this:
And, if you are ok with only supporting watchOS 7, which was released in September 2020, then this is all you need to do.
But, if you want to support watchOS 6, which predates PageTabViewStyle, but not SwiftUI, then you have to use a different technique.
How to make a watchOS 6 compatible project
Before 2019, in watchOS 5 and before, WatchKit developers used a mix of WatchKit specific classes and Storyboards.
When SwiftUI first came out, it wasn't able to fully replace that, and so the root view of the app and page navigation still had to be done using storyboards. But, we had a new object, a Hosting Controller, that could host SwiftUI views.
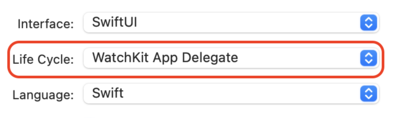
If you want to make a new app that supports watchOS 6, you need to specify different parameters when you go through the Xcode New Project dialogs. On the first screen, set the Interface to Storyboard and Life Cycle to WatchKit App Delegate.
Now, your project is in the kind of SwiftUI hybrid that is supported in watchOS 6. If this is important to your project, it's well worth it. But, by late 2021, when watchOS 8 is about to be released, consider dropping v6 so that you can use the much simpler method.
Hosting Controllers and Storyboards
The project uses SwiftUI for the content of the screens, but top-level navigation is handled by building it in the Storyboard and connecting up Hosting Controllers.
Here's how we build a three page watch app.
First, add two more content views to ContentView.swift.
struct ContentView2: View {
  var body: some View {
    Text("Page 2")
      .padding()
  }
}

struct ContentView3: View {
  var body: some View {
    Text("Page 3")
      .padding()
  }
}
Then, go to HostingController.swift and add two hosting controllers to hold those views.
class HostingController2: WKHostingController<ContentView2> {
  override var body: ContentView2 {
    return ContentView2()
  }
}

class HostingController3: WKHostingController<ContentView3> {
  override var body: ContentView3 {
    return ContentView3()
  }
}
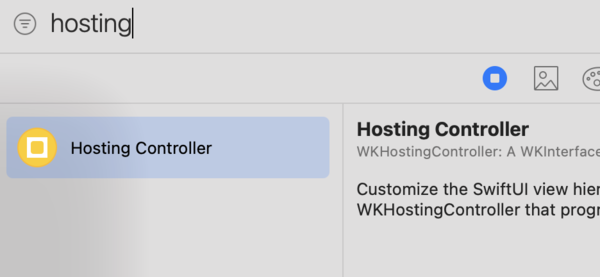
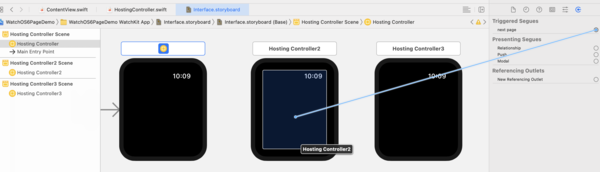
The final step is to connect it up in the Storyboard.
- Open Interface.storyboard
- Bring up the Library with CMD-SHIFT-L
-
Type "Hosting" in the search to search for Hosting Controller
-
Drag two of them onto the storyboard canvas
- Click one of them and go to the Identity Inspector (OPT-CMD-4) on the right-hand pane
-
Set the class to
HostingController2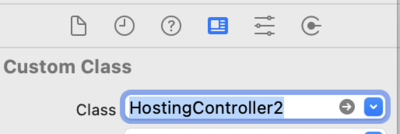
-
Repeat this with the other Hosting Controller, setting the class to
HostingController3 - Select the original Hosting Controller and go to the Connections Inspector (OPT-CMD-7)
-
Drag the next page connector onto Hosting Controller 2
-
Repeat with Hosting Controller 2, dragging its next page connector onto Hosting Controller 3
If you run the project now, you'll see that you have three pages
In the next article, we'll look at the final navigation topic, which is how to change from one root view to another. In a Workout app, we have the setup screens, but then when we want to do a workout, we change to a different set of pages. When we end the workout, we go back to the setup pages.
We'll learn how to do that next.
Subscribe to be notified of the next WatchKit article
Make sure to sign up to my newsletter to get notified when a new article is published.
Contact me if you are working on a Watch app and need help.
Next Article: How to navigate from one page set to another in WatchKit