Apple Watch App SwiftUI Simple Example Views
Here are some examples of simple SwiftUI views that do common things on an Apple Watch
by
 Lou Franco
In the previous article, I walked through a minimal Apple Watch App built with an Xcode template.
If you already tried out SwiftUI on the iPhone, most of what you know works the same on the watch. If you haven't, here are simple recreations of user interfaces in two of the built-in Apple Watch apps.
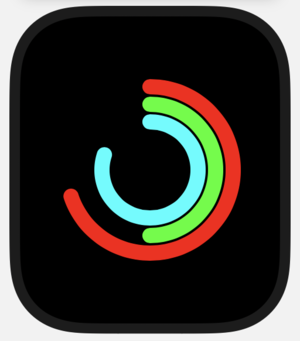
Example 1: Activity Rings
First, start with a reusable view to draw a partial circle (using trim)
struct ActivityCircle : View {
    let color: UIColor
    let pct: CGFloat

    var body: some View {
        Circle()
            .trim(from: 0, to: pct)
            .rotation(Angle(degrees: -90))
            .stroke(style: StrokeStyle(lineWidth: 13, lineCap: .round, lineJoin: .round))
            .foregroundColor(Color(color))
    }
}
And then show them in a ZStack, using padding to get them to nest inside each other.
struct ContentView: View {
    var body: some View {
        ZStack {
            ActivityCircle(color: .red, pct: 0.7)
                .padding(10)
            ActivityCircle(color: .green, pct: 0.5)
                .padding(25)
            ActivityCircle(color: .cyan, pct: 0.8)
                .padding(40)
        }
    }
}
It will look like this:
Exercises:
- Play around with
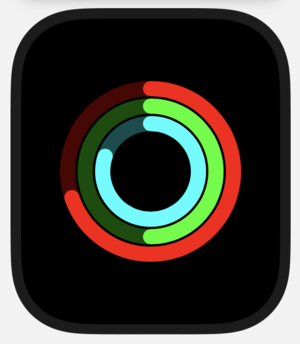
rotationto see why we need to set it to-90 - Add a dark full
Circleunder the one in theActivityCircle. Use aZStack. Here is an extension onUIColorthat you can use to get a color to use for it.
extension UIColor {
    func with(alpha: CGFloat) -> UIColor {
        var r: CGFloat = 0
        var g: CGFloat = 0
        var b: CGFloat = 0
        self.getRed(&r, green: &g, blue: &b, alpha: nil)
        return UIColor(red: r, green: g, blue: b, alpha: alpha)
    }
}
You want it to look like this:
Example 2: Breathe
The breathe app overlaps circles around a circle, like this:
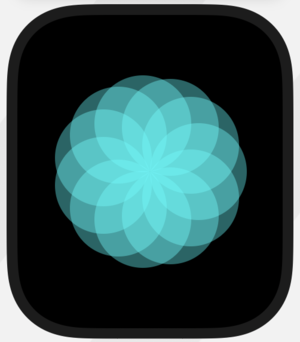
To do that, we need to do some math. We can use cosine and sine to find the position on a circle given an angle.
func circlePositionOf(angle: CGFloat, center: CGPoint, radius: CGFloat, spread: CGFloat) -> CGPoint {
    return CGPoint(
        x: center.x + cos(angle) * radius / 2 * spread,
        y: center.y + sin(angle) * radius / 2 * spread
    )
}
Then, we need GeometryReader to get the size of the view to base the size and position on. We are also going to use the UIColor extension from the ActivityCircle example above, so make sure to include that.
struct ContentView: View {
  // Set this to a value from 0.0 to 1.0
  let spread: CGFloat = 1.0

  // The count of circles
  let count = 11

  var body: some View {
    GeometryReader { geometry in
      ZStack {
        ForEach(0..<count) { i in
          Circle()
            .foregroundColor(Color(UIColor.cyan.with(alpha: 0.4)))
            // The size of each circle is half of the size we are allotted
            .frame(
              width: geometry.size.width / 2.0,
              height: geometry.size.height / 2.0)
            // The position is the center of the circle, with (0, 0) at the top-left
            .position(
              circlePositionOf(
                angle: CGFloat(i) / CGFloat(count) * 2.0 * CGFloat.pi,
                center: CGPoint(x: geometry.size.width / 2,
                        y: geometry.size.height / 2),
                radius: geometry.size.width / 2,
                spread: spread))
        }
      }
    }
    // Make the width and height equal
    .aspectRatio(1.0, contentMode: .fit)
  }
}
The spread controls how far apart the circles are. When it is 0.0, the circles are on top of each other at the center of the view. When it's 1.0, the circles are at their maximum distance from the center, which is 1/4 of the full size of the view.
Probably the easiest way to learn how this works is to just play with the code.
- Change
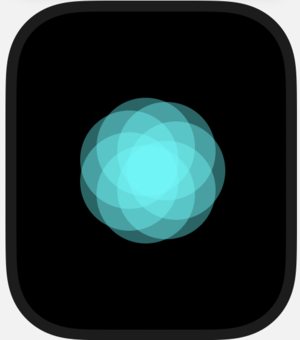
spreadto0.5or to0.0. - Change
countto7or15to see what it looks like with fewer or more circles.
With spread set to 0.5 and count set to 7, it looks like this:
The spread could be the basis of the breathing animation. We would set up a time publisher using Combine and then transform the time into value oscillating between 1.0 and 0.0. We could also make it rotate (by changing the angle we pass in to circlePositionOf).
We'll see that next.
Further Reading
These articles will touch on SwiftUI, but if you are new to it, you should check out these resources:
- Apple provides extensive tutorials on SwiftUI
- See this HackingWithSwift article about GeometryReader
This series is going to concentrate on the specific things you know to make a watch app given knowledge of SwiftUI.
Subscribe to be notified of the next WatchKit article
Make sure to sign up to my newsletter to get notified when a new article is published.
Contact me if you need help with this tutorial.
Next Article: Apple WatchKit Breathe Animation Tutorial