How to Learn what Auto Layout Errors Mean
by
 Lou Franco
Filed under: iOS, Auto Layout and Constraints and Storyboards

You’ve done the Stanford iOS course and all of the Wenderlich Auto Layout tutorials, but your app is still dumping
Unable to simultaneously satisfy constraints. Probably at least one of the constraints in the following list is one you don't want
to the console every time you make a new screen.
You ask on StackOverflow, but the question gets closed because there’s no good way to paste your Storyboard into a box that wants Markdown. And screenshots are even worse.
It’s so frustrating—why can’t Xcode show a better error?!?
Xcode doesn’t really know what’s going on
Auto Layout errors are hard to understand because Xcode doesn’t know how to explain what’s wrong.
Auto Layout is a complex algorithm. All it knows is that it can’t figure out the position of a view, but it might not know why or how to tell you which view is having the problem. And when it finds a conflict in the constraints, it doesn’t really know which one is the extra one, so it removes one randomly.
But, over time, by working on a lot of constraint-based layouts, and running into (and then solving) problems, these errors actually start to make sense.
So, all you really need is practice.
But even if you work on apps full-time, you’ll spend very little time on Auto Layout, so it’s hard to get enough exposure.
You can jump start this process
One of my tips to programmers learning any new technology for the first time is to break working things on purpose.
Then, go look at the broken thing and see how it behaves. Generally, when we make broken things, we don’t really know how it’s broken, but you totally know what’s wrong this time because you know how you broke it.
So, now you can fix it.
To help with this process, I wrote EventOMat, a simple app to support a talk I gave at NerdSummit earlier this year. It implements the conference’s agenda (and can be used as a template for any conference).
But if you go to the repository, you’ll see that there are a bunch of “exercise” branches (e.g. here’s the first exercise). Each exercise branch is the full app with a few lines of code (or some part of the Storyboard) removed.
The README in each branch has hints about how to fix it. If you get stuck, you can just look at the last few commits in the branch that set up the exercise.
Make a missing constraint tutorial
You can use this app to make as many Auto Layout practice exercises as you want.
Here’s how we make a new one from the master branch.
Step 1: Choose a constraint in the storyboard

Step 2: Delete it

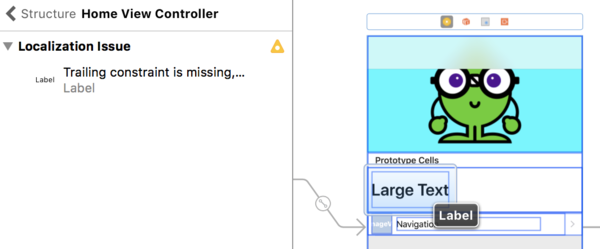
Step 3: Read the error and relate it to what you just did

This one is simple—it says that the Trailing constraint is missing for Label and highlights it. Your job is to put in a trailing constraint.
Don’t let Xcode make the constraint
If you click the yellow warning icon, Xcode will offer to make the constraint for you. DON’T DO THIS.
The problem is that Xcode doesn’t know what you want the view to look like, so it will make a constraint that preserves the sizes and positions that you currently see.
But we want the view to stretch the whole width, so set the trailing anchor to be equal to its superview’s trailing anchor.
Make as many as you need
I pushed the broken branch as Exercise 6 in EventOMat if you want to try it out.
But don’t stop there. You can use this app (or any working one) as a starting point to learn more about Auto Layout. Just pick some constraint and remove it. Then relate that to the error you get and fix it.
After you have done that a while, start adding in new constraints. This will probably over-specify the constraint system and cause different errors (sometimes just in different device sizes).
I have a lot more to say on this topic, so subscribe below to make sure you don’t miss more ways to learn and practice Auto Layout.